
Your Ultimate Guide to Wrapping a Baby Sling: Step-by-Step for Cozy Comfort and Connection
Hey there, amazing parent! Are you feeling a little overwhelmed by the idea of babywearing, perhaps with a long piece of fabric that seems to have a mind of its own? You’re definitely not alone! Many of us start our babywearing journey feeling a mix of excitement and "how on earth do I even begin with this?!" But imagine having your little one snuggled close, feeling your heartbeat, while you enjoy the freedom of having your hands back – whether it’s for a warm cuppa, a quick chore, or just holding your partner’s hand.
That dream is absolutely within reach, and it’s much simpler than you might think. This comprehensive guide is designed to demystify the art of wrapping a baby sling, specifically focusing on the wonderfully versatile long wraps (often called woven or stretchy wraps). We’ll walk you through each step, from choosing the right wrap to mastering a fundamental carry, ensuring both you and your precious cargo are safe, secure, and supremely comfortable.
By the time you finish reading, you’ll not only feel confident in tackling that wrap but also excited about the incredible bonding experience and newfound freedom that babywearing offers. So, let’s unroll that fabric of possibilities together and get ready for some hands-free snuggles!
Ready to Wrap? Essential Pre-Sling Checks
Before you even think about tossing that beautiful fabric over your shoulders, taking a few moments for some crucial pre-sling checks can make all the difference. Think of this as your babywearing warm-up – a little preparation now saves a lot of head-scratching (and maybe a few sighs!) later. Getting these foundational steps right sets you up for a smooth, comfortable, and most importantly, safe babywearing experience.
It’s like baking a cake; you wouldn’t just throw ingredients into a bowl without checking if you have everything and if the oven is preheated, right? Similarly, preparing yourself, your space, and understanding your wrap ensures your "babywearing cake" comes out perfectly. Let’s make sure you’re fully prepared to embark on this cozy adventure with confidence and peace of mind.
These initial steps are truly the secret sauce to making babywearing feel less like a puzzle and more like a natural extension of your loving embrace. They empower you with the knowledge and readiness needed to create a safe and happy space for your little one, right there with you.
Choosing Your Baby Sling Wisely
When you first dive into the world of baby slings, you might encounter a delightful array of options. For "wrapping," we’re primarily talking about long pieces of fabric: the stretchy wrap and the woven wrap. A stretchy wrap, often made of cotton jersey or a blend, is fantastic for newborns and younger babies up to about 15-20 pounds, offering a snug, womb-like experience. Its give and bounce make it incredibly forgiving for beginners, as you can pre-tie it before putting your baby in.
Woven wraps, on the other hand, are made from non-stretchy fabric like cotton, linen, hemp, or blends, and come in various lengths and patterns. These are incredibly versatile and can be used from birth through toddlerhood for a multitude of carries on your front, hip, or back. While they have a steeper learning curve than stretchy wraps because they need to be tied with the baby in place (or very precisely pre-tied), their support and longevity make them a favorite for many experienced babywearers.
Consider your baby’s age and your primary needs when choosing. If you have a newborn and want something soft and simple, a stretchy wrap is a wonderful starting point. If you’re looking for a long-term investment that grows with your child and offers more carry options, a woven wrap might be your ultimate goal, though you might start with a stretchy for initial confidence.
The Golden Rules of Babywearing Safety (TICKS)
Safety is always, always paramount when it comes to babywearing. There’s a simple, memorable acronym called TICKS that serves as your essential checklist every single time you wrap your baby. Mastering this isn’t just a suggestion; it’s the foundation of secure and enjoyable babywearing. Let’s break it down:
T is for Tight: The wrap should be snug enough to hug your baby close to you. Any slack or sagging will allow your baby to slump, which can hinder their breathing and strain your back. Think "snug as a bug in a rug" – no loose fabric that could allow your baby to shift or fall.
I is for In View at all times: You should always be able to see your baby’s face by simply glancing down. Their nose and mouth should be clear of fabric, your body, or anything else that could obstruct their airway. If their head is turned into your chest, gently adjust them so their face is visible.
C is for Close enough to kiss: Your baby’s head should be close enough to your chin that you can easily lean down and kiss the top of their head. This ensures they are positioned high enough on your body, preventing them from slumping down into the wrap where their airway could become compromised.
K is for Keep chin off chest: A baby’s chin should never be curled down onto their chest, as this can restrict their breathing. Ensure there’s always a gap of at least a finger-width under their chin. If their chin is tucked, gently reposition them to tilt their head back slightly.
S is for Supported back: Your baby’s back should be supported in its natural, rounded position, and their tummy and chest should be against you. If the wrap is too loose, your baby could slump, which is dangerous. For newborns and young infants, ensure their head and neck are also well-supported until they develop strong head control. Always check that their spine is supported from knee-pit to knee-pit, forming a natural "M" shape with their legs and bottom.
Preparing Your Space and Mindset
Okay, you’ve got your wrap, and you’re armed with the TICKS safety knowledge. Now, let’s set the stage for your first wrapping attempt! Find a quiet, well-lit space where you won’t be rushed or distracted. Stand in front of a mirror, if possible, as it’s incredibly helpful for seeing what you’re doing behind your back and making adjustments. Clear any clutter from your immediate area so you have room to move freely.
A fantastic tip, especially for beginners, is to practice with a doll or a large stuffed animal before attempting to put your precious human baby in the wrap. This allows you to get a feel for the fabric, the motions, and the tightening without the added pressure of a wiggling, possibly crying, baby. You can repeat the steps as many times as you need to build muscle memory and confidence.
Finally, and perhaps most importantly, approach this with a sense of patience and a sprinkle of humor. It’s absolutely okay if your first (or fifth!) attempt isn’t perfect. Babywearing is a skill, and like any new skill, it takes practice. Give yourself grace, enjoy the process, and remember that every little step brings you closer to those wonderful, hands-free snuggles. You’ve got this!
Let’s Begin! The First Steps to a Cozy Wrap
Alright, the moment has arrived! You’re prepared, you know your wrap, and you’re ready to get hands-on. For our step-by-step guide, we’re going to focus on the Front Wrap Cross Carry (FWCC). This is widely considered the quintessential beginner carry, especially with a stretchy wrap, because it’s incredibly versatile, secure, and allows for pre-tying, which is a huge confidence booster for new parents.
The FWCC creates multiple passes of fabric over your baby, providing excellent support for their developing body and distributing their weight comfortably across your shoulders and back. It’s truly a foundational carry that, once mastered, opens the door to understanding the mechanics of wrapping and will make learning other carries much, much easier down the road. So, let’s take it one simple step at a time, and before you know it, you’ll be a wrapping pro!
Remember, this isn’t a race to perfection. Think of it more like a dance with your baby – a series of gentle movements that, when put together, create a beautiful, harmonious connection. Don’t be afraid to pause, readjust, and even take a deep breath. Your baby will appreciate your calm and confident approach more than anything.
Mastering the Front Wrap Cross Carry (FWCC) – Step-by-Step
Step 1: Find Your Center and Drape
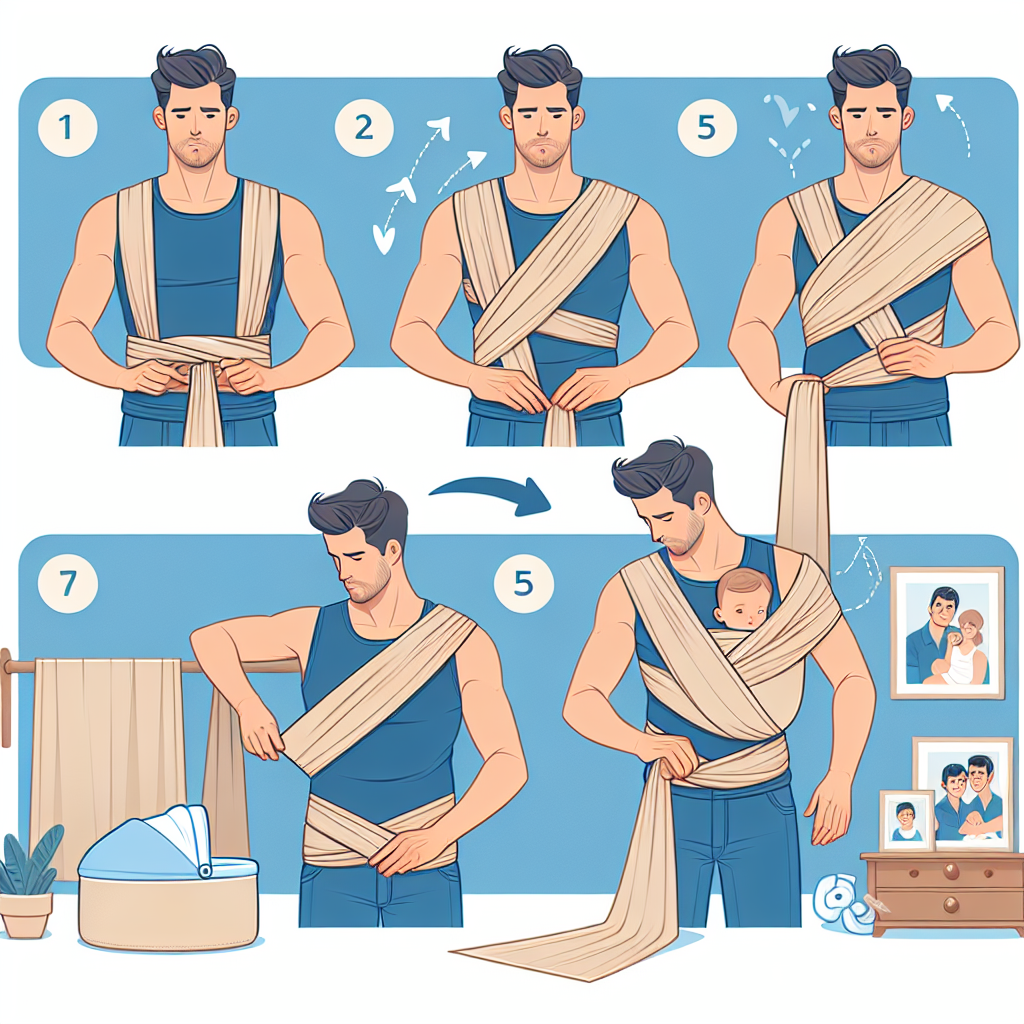
Begin by finding the middle marker of your wrap (it’s usually a tag or a small piece of fabric sewn onto the middle). Place this marker against your belly, letting the rest of the fabric hang down evenly on both sides. Now, take one side of the wrap and bring it over your opposite shoulder, ensuring the fabric is flat and untwisted. Do the same with the other side, bringing it over your other shoulder. You should now have an "X" shape on your back, with two long tails hanging down in front.
Step 2: Cross and Tuck
Next, gather the fabric from under one arm and bring it across your chest, aiming for the opposite side. Do the same with the other tail, creating a large, snug "X" across your front. This is where your baby will sit. The fabric should be spread wide, from your shoulder to your hip, to create a comfortable "seat" for your little one. Think of it like creating two big, soft pockets for your baby to snuggle into.
Step 3: Secure the Tails
Now, take the two tails that are hanging down in front of you (the ones that just crossed over your chest). Bring one tail underneath the opposite cross pass and then over the top. Repeat with the other tail, so both tails are now threaded through the "X" on your chest, coming out from underneath. This creates a secure, snug fit. Pull both tails to tighten the "X" on your chest – it should feel comfortably snug, but not constricting, as if you’re wearing a fitted vest. Tie the tails securely behind your back in a double knot, or if you have a very long wrap, you can bring them back around to the front and tie them under your baby’s bum for extra security.
Gently Placing Your Little One Inside
Now for the best part – bringing your baby into the cozy wrap! Gently pick up your baby, supporting their head and neck, especially if they are a newborn. Locate the top cross pass (the one closest to your chest) and gently open it up to create a "pouch." Carefully slide one of your baby’s legs through this pouch. Your baby should be facing you, with their bottom resting in the deepest part of the "X."
Next, support your baby with one arm while you find the second cross pass (the one furthest from your chest). Open it up and slide your baby’s other leg through this second pouch. Your baby should now be securely nestled against your chest, with their bottom forming a deep "M" shape (knees higher than their bottom) and their back naturally rounded. For newborns, ensure their head is supported by the fabric and their chin is off their chest (remember TICKS!).
Finally, take the horizontal pass of fabric that goes across your belly (the one you started with, where your middle marker was). Pull this fabric up over your baby’s back, from knee-pit to knee-pit, and up to the nape of their neck (or higher for head support if needed). This pass acts as a third layer of support, creating a secure "seat" for your baby. Smooth out all three layers of fabric across your baby’s back to ensure even support and comfort.
The Art of Adjustment: Ensuring Comfort and Security
Once your baby is nestled in the wrap, it’s time for the crucial adjustment phase. This is where you fine-tune the fit for both your comfort and your baby’s safety. Start by pulling any slack out of the wrap, strand by strand, from the top rail down to the bottom. If you feel any looseness, gently tug on the corresponding tail until the fabric is snug. Remember, the goal is "tight, but not restrictive."
Walk around a bit, perhaps do a few gentle squats or bend over (while supporting your baby’s head with a hand, of course!), and see how the wrap feels. Does your baby feel secure? Are they sagging down? If so, untie and retighten, focusing on pulling all the slack out. Pay special attention to the top rail, ensuring it’s snug around your baby’s neck to prevent slumping.
Finally, do a full TICKS check: Is baby Tight? In view? Close enough to kiss? Chin off chest? Back Supported? Look in the mirror from various angles. Adjust the fabric over your shoulders so it’s spread wide, distributing the weight evenly and preventing digging. It might take a few tries, but with each attempt, you’ll gain a better understanding of how the fabric moves and how to achieve that perfect snuggle. You’re doing great!
Your Babywearing Journey: Tips for Success and Staying Connected
You’ve taken the leap, you’ve practiced, and you’re starting to get the hang of it – congratulations! Babywearing isn’t just about wrapping; it’s about connecting, exploring, and reclaiming a little bit of your freedom while keeping your little one close. Every wrap you master, every snuggle you share, builds your confidence and strengthens that incredible bond. So, keep at it, because the rewards are truly boundless.
Remember that babywearing is a journey, not a destination. There will be days when the wrap goes on perfectly on the first try, and days when your baby is fussy, or you just can’t seem to get it right. That’s perfectly normal! Embrace the learning process, celebrate your small victories, and know that each attempt is bringing you closer to becoming a seasoned babywearing pro.
Ultimately, babywearing is a beautiful tool for nurturing both your baby and yourself. It offers the gift of closeness, the joy of shared experiences, and the sheer practicality of having two hands free to navigate your world. So, tie that knot, snuggle that baby, and enjoy every precious moment of this unique and empowering journey.
Troubleshooting Common Wrap Woes
Even seasoned babywearers encounter little hiccups from time to time, so don’t fret if your wrap isn’t always picture-perfect. One common issue is the "sagging baby." If your little one seems to be sinking or feeling too low, it’s usually a sign that the wrap isn’t tight enough, especially in the horizontal pass or the top rails. Untie, re-position your baby higher (aim for close enough to kiss), and pull the slack out more vigorously, strand by strand, before tying off.
Another frequent complaint is the wrap digging into your shoulders or back. This typically means the fabric isn’t spread wide enough across your back and shoulders. After putting the wrap on, reach behind you and pull the fabric wide, smoothing it out from shoulder to shoulder. The wider the fabric is spread, the more evenly the weight is distributed, making it much more comfortable for you. Sometimes, a quick adjustment to your posture can also help!
Finally, a fussy baby in the wrap can be disheartening. First, do a TICKS check to ensure safety and comfort – maybe their chin is tucked, or they’re too hot/cold. If they’re safe and still unhappy, they might be hungry, need a diaper change, or simply want to be out. Sometimes, a few bounces or a walk can soothe them. Remember, a wrap isn’t a magic wand, but often, the close contact is exactly what they need!
Embracing the Babywearing Lifestyle
Once you’ve nailed the basic wrap, a whole new world of possibilities opens up! Imagine being able to enjoy a leisurely walk, navigate crowded places, or even simply get dinner ready, all while your baby is contentedly snuggled against you. This hands-free freedom is a game-changer for many parents, allowing you to participate more fully in everyday life without feeling tethered to a stroller or constantly holding your baby.
Babywearing also offers incredible benefits beyond just convenience. The close physical contact can help regulate your baby’s temperature, breathing, and heart rate, promoting better sleep and reducing fussiness. It’s also fantastic for discreet nursing on the go, allowing you to feed your baby whenever and wherever needed with ease. Many parents find it enhances bonding, promoting a deeper connection and understanding of their baby’s cues.
Consider Sarah, a new mom who initially felt trapped at home with her fussy newborn. After learning to wrap, she started taking daily walks, able to enjoy the fresh air and chat with friends while her baby slept soundly in the wrap. "It wasn’t just about getting things done," she shared, "it was about feeling connected to the world again, with my baby right there with me. It truly transformed our days." So go on, embrace the babywearing lifestyle – it’s a wonderful journey for both of you!
Frequently Asked Questions About Baby Sling Wrapping
Got more questions? You’re not alone! Here are some common queries from parents embarking on their babywearing journey.
Is it really hard to wrap a baby sling?
It might look complicated at first glance, but no, it’s not inherently hard! It’s a skill, like learning to tie your shoes or ride a bike. With practice, patience, and a good step-by-step guide (like this one!), you’ll find it becomes second nature. Many parents find they master a basic carry like the Front Wrap Cross Carry within a few attempts.
How long does it typically take to become proficient at wrapping?
Most parents feel confident with a basic wrap after 5-10 solid practice sessions. Consistency is key! If you practice a few times a day for a week, you’ll likely feel much more comfortable and efficient. Remember, practicing with a doll first can significantly speed up your learning curve.
What’s the absolute safest way to wear my baby in a wrap?
Always adhere to the TICKS safety guidelines: Tight, In view, Close enough to kiss, Keep chin off chest, Supported back. Ensure your baby’s airway is clear, they are snug against you, and their back and neck are well-supported in a natural "M" position.
Which type of baby wrap is ideal for a brand-new newborn?
Stretchy wraps are often recommended for newborns due to their soft, forgiving fabric and ease of pre-tying. They provide a wonderfully snug, womb-like environment that many newborns adore. Woven wraps can also be used from birth, but they require a bit more precision in tying.
Can I comfortably breastfeed while my baby is in the wrap?
Absolutely! Many parents find babywearing an excellent tool for discreet and convenient breastfeeding. Once your baby is securely wrapped, you can often loosen the top rail slightly and gently lower your baby to nipple height. Always ensure your baby’s airway remains clear and their chin is off their chest while feeding.
How snug should my baby wrap be for optimal safety and comfort?
Your baby wrap should be snug enough to hug your baby securely to your body without any sagging or gaping. Imagine the feeling of a supportive, comfortable hug – that’s the kind of snugness you’re aiming for. Too loose, and your baby can slump; too tight, and it can be uncomfortable for both of you. Always prioritize the TICKS safety rules.