
How to Wash Baby Bottles: Your Ultimate Guide to Squeaky-Clean Sips
Welcoming a new baby into your life is an incredible journey, filled with precious firsts and endless cuddles. But let’s be honest, alongside the joy, there’s also a mountain of new responsibilities – and a surprising number of baby bottles to wash! If you’ve ever found yourself staring at a sink full of milky bottles, wondering if you’re doing it right, or if you’re missing a crucial step, you are absolutely not alone. Many parents feel overwhelmed by the constant need for clean feeding gear, and it’s easy to second-guess your methods when your little one’s health is at stake.
The good news is that washing baby bottles doesn’t have to be a daunting chore. With the right tools, techniques, and a little bit of know-how, you can confidently ensure every bottle your baby uses is sparkling clean and safe. This comprehensive guide is designed to empower you, offering clear, step-by-step instructions, practical tips, and reassuring advice to turn bottle washing from a worry into a simple, efficient part of your daily routine. We’ll cover everything from the essential supplies to advanced sterilization, ensuring you feel completely equipped and confident in providing the cleanest possible feeding experience for your precious bundle.
Think of this article as your friendly companion in the kitchen, guiding you through the ins and outs of bottle hygiene. We’ll break down the process into manageable steps, address common concerns, and share insights that will save you time and provide peace of mind. By the end of our chat, you’ll not only know how to wash baby bottles like a pro, but you’ll also understand why each step is important, giving you that much-deserved boost of confidence in your parenting journey. Let’s dive in and get those bottles gleaming!
Starting Fresh: The Essentials for Squeaky-Clean Baby Bottles
The journey to perfectly clean baby bottles begins even before the water runs. Establishing a dedicated, organized cleaning station and understanding the fundamental reasons behind rigorous hygiene are your first crucial steps. It’s about more than just aesthetics; it’s about creating a safe feeding environment for your little one, protecting them from unseen germs and bacteria that can thrive in milk residue. Setting up your space efficiently will not only make the task less cumbersome but also ensure consistency in your cleaning routine.
Many parents find themselves juggling multiple tasks while trying to keep up with the seemingly endless cycle of dirty bottles. It’s easy to feel rushed or to wonder if you truly need all those specialized cleaning tools. However, investing a little time upfront to gather your supplies and understand the "why" behind the "how" can significantly streamline your process and reduce stress in the long run. A well-prepared parent is a confident parent, and that confidence extends right down to the cleanliness of your baby’s feeding equipment.
Remember, every drop of milk, every tiny speck of residue, can become a breeding ground for unwanted microorganisms if not properly addressed. This initial section will walk you through setting up your cleaning zone, highlighting the essential tools you’ll need, and reinforcing the critical importance of immediate action when it comes to dirty bottles. Consider this your foundational knowledge for becoming a bottle-washing wizard – armed with the right gear and the right mindset from the very start.
Gathering Your Bottle-Washing Arsenal
Before you even think about scrubbing, make sure you have the right tools at your disposal. A dedicated set of bottle-washing supplies will not only make the task easier but also prevent cross-contamination from other kitchen items. Think of these as your specialized instruments for a very important mission: ensuring your baby’s health through impeccable bottle hygiene. Having everything within arm’s reach also saves precious time, which, as a new parent, you know is a priceless commodity.
Your essential kit should include a bottle brush with a sturdy handle and durable bristles, designed to reach every curve and corner of your baby’s bottles. Look for one that often comes with a smaller nipple brush, perfect for those tiny, hard-to-clean spots in bottle nipples and rings. You’ll also need a gentle, unscented dish soap specifically formulated for baby items, or one that is food-grade and free from harsh chemicals and dyes. This ensures no irritating residues are left behind that could upset your baby’s sensitive tummy.
Don’t forget a dedicated basin or tub for washing, separate from your regular kitchen sink, especially if your sink is used for raw meat or other items. A drying rack specifically designed for baby bottles and their components is also a game-changer, allowing air to circulate freely and prevent moisture buildup, which can lead to mold or mildew. Having these items ready and waiting means you’re always prepared for the next washing cycle, making the process feel less like a chore and more like a seamless part of your daily routine.
Why Every Wash Matters: The "Why" Behind the Wow
It might seem tedious to wash baby bottles after every single feeding, but this consistent effort is a cornerstone of your baby’s health and well-being. Milk, whether breast milk or formula, is a rich organic substance that provides an ideal environment for bacteria to multiply rapidly, especially at room temperature. If left uncleaned, these microscopic invaders can quickly grow to levels that could potentially cause tummy upsets, diarrhea, or even more serious infections in your little one’s developing system.
A baby’s immune system is still immature and much more vulnerable than an adult’s. What might be a minor inconvenience for you could be a significant health challenge for them. Therefore, thorough cleaning isn’t just about removing visible milk residue; it’s about eliminating the invisible threats that could compromise your baby’s delicate digestive and immune systems. Every wash is a proactive step in safeguarding their health, providing a clean slate for their next nourishing meal.
Understanding this vital "why" can transform the chore into a meaningful act of care. It shifts your perspective from a burdensome task to an essential protective measure. By consistently washing bottles immediately after use, you are actively preventing bacterial growth, ensuring that each feeding is not only nutritious but also as safe and hygienic as possible. This commitment to cleanliness is a powerful way to show your baby you care, providing them with the best possible start in life, one meticulously clean bottle at a time.
The Golden Rule: Clean Now, Relax Later
One of the most valuable pieces of advice for bottle washing is to tackle them immediately after your baby finishes feeding, or as soon as practically possible. While it might be tempting to let them pile up in the sink, especially when you’re exhausted, fresh milk residue is far easier to remove than dried, caked-on remnants. Prompt washing prevents milk proteins and fats from adhering stubbornly to the bottle’s surfaces, which can make scrubbing significantly harder and less effective in the long run.
Think of it as a quick rinse versus a lengthy soak and scrub session. A quick rinse with warm water immediately after feeding can remove most of the liquid milk, leaving only a light film that is easily tackled with soap and a brush. This simple habit saves you considerable time and effort later, ensuring that your cleaning process is efficient and thorough without requiring excessive elbow grease. It’s a small act that yields big benefits in terms of ease and hygiene.
Establishing this "clean now, relax later" routine can also help you stay on top of the bottle mountain, preventing that overwhelming feeling of a perpetually full sink. Imagine finishing a feeding, quickly rinsing the bottle, and placing it in your dedicated wash basin. When you have a moment, perhaps during your baby’s next nap, you can then complete the full wash and drying process without facing a daunting backlog. This proactive approach ensures a steady supply of clean bottles, ready for your baby’s next hungry moment, and gives you more time back for those precious cuddles.
Mastering the Wash: Hand Washing & Dishwasher Techniques
Once you’ve gathered your supplies and embraced the philosophy of prompt cleaning, it’s time to dive into the practical art of washing baby bottles. Whether you prefer the meticulous control of hand washing or the modern convenience of a dishwasher, understanding the correct techniques is paramount. Each method has its own nuances, and mastering them ensures that every component of your baby’s feeding equipment is thoroughly cleansed and ready for its next use. It’s about combining effectiveness with efficiency, choosing the method that best fits your lifestyle while always prioritizing hygiene.
Many parents wonder which method is truly superior, or if their current approach is doing enough to protect their little one. Rest assured, both hand washing and dishwasher cleaning can be highly effective when done correctly. The key lies in understanding the specific steps for each, paying attention to the details that make all the difference in removing milk residue and preventing bacterial growth. This section will guide you through the intricacies of both methods, empowering you to choose and execute the best cleaning strategy for your family.
From disassembling bottles to the final air-dry, every step plays a role in achieving that squeaky-clean result. We’ll cover how to meticulously clean every nook and cranny by hand, and how to optimize your dishwasher for baby bottle cleaning. By the end of this comprehensive guide, you’ll be a pro at both, confident that you’re providing the cleanest possible feeding environment for your growing baby. Let’s get those bottles sparkling!
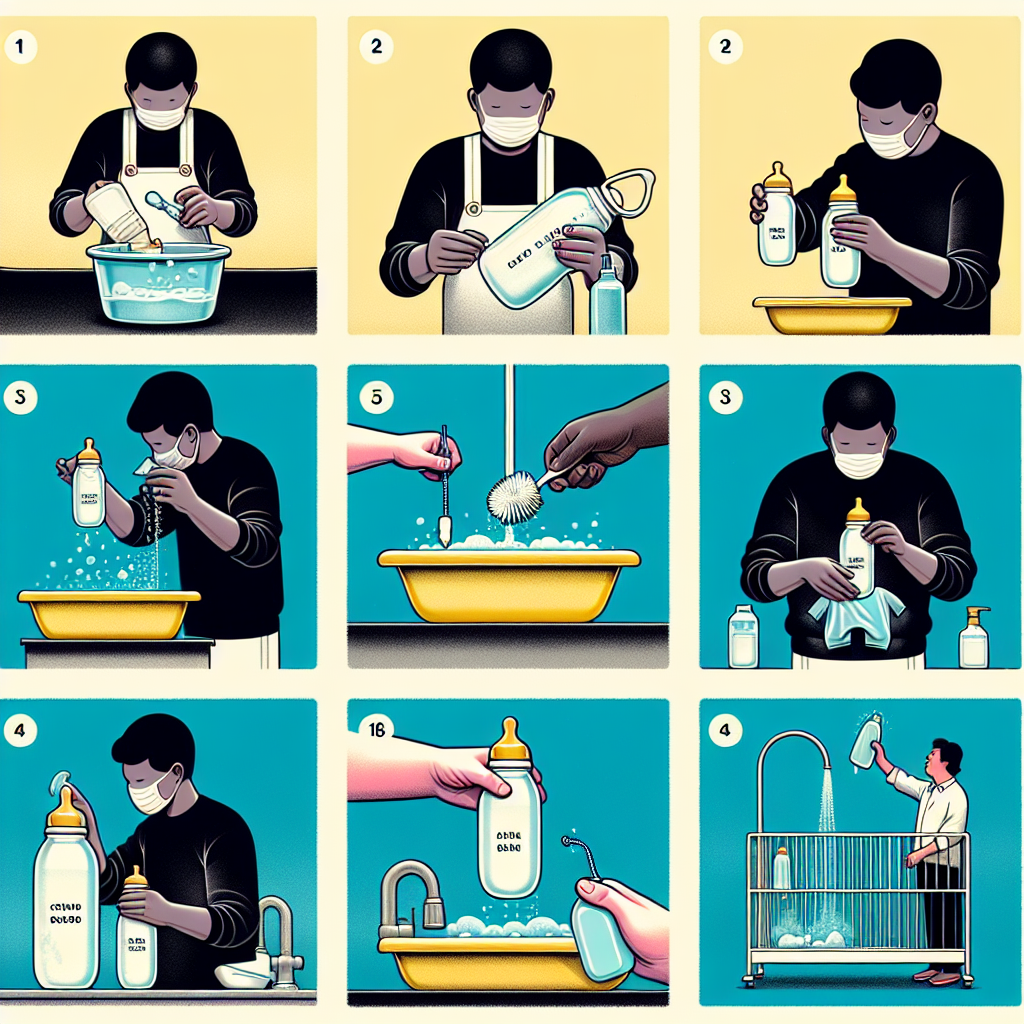
The Art of Hand Washing: A Step-by-Step Guide
Hand washing baby bottles offers a hands-on approach that allows for meticulous attention to every surface and crevice. This method is particularly useful for bottles with intricate parts, oddly shaped components, or if you simply prefer the peace of mind that comes with personally scrubbing every inch. It ensures that even the smallest milk residues are removed, which can sometimes be missed by automated processes. Plus, it’s a great option when you only have a few bottles to clean or don’t have access to a dishwasher.
To begin, disassemble every single part of the bottle: the bottle itself, the nipple, the collar/ring, the cap, and any anti-colic inserts or vents. Each of these components needs individual attention to ensure no milk is trapped. Rinse all disassembled parts under cool, running water immediately to flush out any remaining milk. This initial rinse is crucial for preventing milk from drying and hardening, making the subsequent scrubbing much easier and more effective.
Next, fill your dedicated wash basin with hot water and add a few drops of baby-safe dish soap. Submerge all bottle parts in the soapy water. Using your bottle brush, thoroughly scrub the inside and outside of the bottle, paying extra attention to the bottom and neck where residue often accumulates. For nipples, use the smaller nipple brush to clean the inside, ensuring the feeding holes are clear, and gently rub the outside. Rinse all parts meticulously under warm, running water until no soap bubbles or film remain. This step is vital to prevent your baby from ingesting soap residue, which can cause an upset stomach.
Dishwasher Dynamo: When Convenience Meets Clean
For many busy parents, the dishwasher can be a true lifesaver, offering a convenient and effective way to clean baby bottles, especially in larger quantities. The high temperatures and powerful jets of a dishwasher can provide a thorough clean, and in some cases, even a level of sanitization. However, it’s crucial to ensure your bottles are dishwasher-safe and to load them correctly to maximize cleaning efficiency and prevent damage. Not all plastics or bottle types are suitable for the intense heat of a dishwasher, so always check the manufacturer’s instructions first.
Before placing bottles in the dishwasher, just like with hand washing, you must first disassemble all parts: bottles, nipples, rings, caps, and any internal components. It’s also highly recommended to give each part a quick rinse under running water to remove any visible milk residue. While the dishwasher is powerful, pre-rinsing helps prevent clogs and ensures that dried milk doesn’t get baked onto the bottle surfaces during the wash cycle. Think of it as giving your dishwasher a head start for optimal cleaning.
When loading, place smaller items like nipples, caps, and rings in a mesh laundry bag or a small parts basket designed for dishwashers. This prevents them from flying around and potentially melting or getting lost during the wash cycle. Bottles should be placed upside down on the top rack, ideally over the tines, to allow water to drain completely and ensure thorough cleaning of the interior. Use a hot wash cycle with heated drying (or a sanitizing cycle if available), as the high temperatures are key to effective cleaning and minimizing bacterial growth. After the cycle, allow bottles to air dry completely if the heated dry isn’t sufficient, ensuring no moisture remains before storage.
Drying and Storing: The Final Flourish
After all that diligent washing, the drying and proper storage of your baby bottles are just as crucial as the cleaning itself. Leaving bottles to air dry completely is generally recommended over towel drying, as towels can harbor germs and reintroduce them to your freshly cleaned surfaces. Air drying minimizes the risk of recontamination and ensures that no lingering moisture creates an environment for mold or bacteria to thrive. This final step is essential for maintaining the hygiene you’ve worked so hard to achieve.
A dedicated baby bottle drying rack is an invaluable tool for this stage. These racks are designed with pegs or stands that allow bottles to be placed upside down, promoting maximum air circulation around all surfaces. Nipples, rings, and caps can be placed on separate pegs or in designated areas, ensuring everything dries thoroughly. Position your drying rack in a clean, well-ventilated area, away from potential contaminants like cooking fumes or splash zones from the sink. The goal is to let gravity and air do their work naturally and completely.
Once all bottle components are completely dry – and we mean completely dry, no lingering droplets – you can reassemble them and store them in a clean, dry, and dust-free environment. A closed cabinet or a clean, covered container is ideal. Avoid storing bottles in direct sunlight or overly humid areas. Having a designated spot for your clean, dry bottles not only keeps them hygienic but also makes it incredibly easy to grab one when your little one suddenly demands their next feeding. This organized approach brings peace of mind, knowing that a safe, clean bottle is always within reach.
Beyond the Wash: Sterilization and Troubleshooting for Peace of Mind
While thorough washing removes milk residue and most germs, there are times when an extra layer of protection, known as sterilization, is recommended or even necessary. This step goes beyond simple cleaning, aiming to kill almost all bacteria, viruses, and other microorganisms that might still be clinging to bottle surfaces. Understanding when and how to sterilize can provide an additional safeguard for your baby’s health, particularly during their earliest, most vulnerable weeks. It’s an act of extra care that many parents find reassuring.
Beyond the initial wash and occasional sterilization, you might encounter common bottle-cleaning challenges, such as stubborn milk residue, lingering odors, or discoloration. These issues, while frustrating, are often easily solvable with a few clever tricks and consistent habits. Addressing these problems promptly ensures that your bottles remain in top condition, prolonging their lifespan and maintaining optimal hygiene for your baby. It’s about proactive problem-solving to keep things running smoothly.
This section will demystify the world of sterilization, explaining when it’s most beneficial and outlining the various methods available to you, from traditional boiling to modern steam sterilizers. We’ll also equip you with practical solutions for those frustrating cleaning conundrums, ensuring that no bottle is left behind due to a stubborn stain or a lingering smell. Our goal is to empower you with comprehensive knowledge, giving you complete peace of mind in your bottle care routine.
Demystifying Sterilization: Is It Always Necessary?
The question of whether to sterilize baby bottles often causes confusion for new parents. In many parts of the world, especially for healthy, full-term infants, daily sterilization is not always deemed strictly necessary beyond the initial use or if your baby has a compromised immune system. The Centers for Disease Control and Prevention (CDC) suggests that routine sterilization is particularly important for infants younger than 2 months, those born prematurely, or those with weakened immune systems. For older, healthy infants, thorough cleaning with soap and water is often sufficient.
However, many parents choose to sterilize bottles regularly, especially in the early months, for an added layer of security and peace of mind. Sterilization effectively eliminates nearly all germs, including those that might survive a regular wash. Think of it as a super-clean reset button for your baby’s feeding equipment. It’s a personal choice, and if it makes you feel more comfortable and confident in your hygiene practices, it’s absolutely a worthwhile step to incorporate into your routine.
It’s also crucial to sterilize bottles if they have been used by a sick baby, or if you suspect they may have come into contact with contaminated surfaces. Additionally, after prolonged storage, it’s a good practice to sterilize bottles before their first use. Always remember that sterilization is not a substitute for proper cleaning; bottles must be thoroughly washed with soap and water before being sterilized. Sterilization is the final step in ensuring maximum germ-free safety, not the sole cleaning method.
Popular Sterilization Methods: Your Choices Explained
Once you’ve decided to sterilize, you have several effective methods at your disposal, each offering its own advantages in terms of convenience and efficiency. The most traditional and widely accessible method is boiling. To boil, simply place clean, disassembled bottle parts in a large pot, cover them completely with water, bring the water to a rolling boil, and let them boil for five minutes. This method is highly effective and requires no special equipment beyond a pot and stove, making it a great option for occasional sterilization or when traveling.
Another popular choice is steam sterilization, which can be done using electric steam sterilizers or microwave steam bags/sterilizers. Electric sterilizers are countertop appliances that use heat to create steam, effectively killing germs. They are often quick, convenient, and can hold multiple bottles at once, making them ideal for daily use. Microwave steam bags or containers offer a portable and quick solution, using a small amount of water and your microwave to generate steam. Both steam methods are highly efficient and reduce the need for constant monitoring compared to boiling.
For those who prefer a cold sterilization method, chemical sterilizing tablets or liquids can be used. These solutions typically involve dissolving a tablet in cold water and submerging the clean bottle components for a specified period, usually 30 minutes. This method is excellent for travel or situations where heat sterilization isn’t feasible, as it requires no electricity or stove. However, ensure thorough rinsing to remove any chemical residue before use. Whichever method you choose, always ensure the bottles are completely dry before storage to prevent recontamination.
Tackling Tricky Stains and Lingering Odors
Even with diligent washing and occasional sterilization, you might occasionally encounter a stubborn milk film, persistent odors, or slight discoloration, especially with clear plastic bottles. These issues are common, but they don’t mean your bottles are ruined or unsafe. Often, they’re simply a sign that milk proteins or fats have created a lingering residue. The good news is that these challenges are usually easily remedied with a few targeted approaches and a little extra care, restoring your bottles to their pristine condition.
For stubborn milk residue that seems to cling to the plastic, try using a paste made from baking soda and water. Apply the paste to the affected areas with your bottle brush, let it sit for a few minutes, then scrub thoroughly. Baking soda is a gentle abrasive and a natural deodorizer, making it effective at breaking down milk proteins and neutralizing smells without harsh chemicals. For hard-to-reach spots, a pipe cleaner can be surprisingly effective for scrubbing small vents or crevices in anti-colic systems.
Lingering sour milk smells can also be banished with the power of baking soda. After washing, fill the bottle with warm water and add a teaspoon of baking soda, then let it sit overnight. The baking soda will absorb the odors. Alternatively, soaking bottles in a dilute solution of white vinegar (1 part vinegar to 4 parts water) for an hour can also work wonders as a deodorizer and can help with mineral buildup from hard water. Always rinse thoroughly with clean water after using any of these methods to ensure no residue remains. By addressing these minor issues promptly, you keep your bottles fresh, clean, and ready for countless more feeds.
Your Confidence, Bottled Up: A Clean Start Every Time
You’ve navigated the world of baby bottle washing, from gathering your essential tools to mastering both hand washing and dishwasher techniques, and even delving into the nuances of sterilization and troubleshooting common snags. It might have seemed like a mountain of information at first, but now you’re equipped with a comprehensive understanding that goes beyond just scrubbing and rinsing. You know the "why" behind every "how," which empowers you to make informed decisions about your baby’s feeding hygiene.
Remember, every single clean bottle you prepare is a testament to your dedication and care for your little one’s health and well-being. It’s a small, repetitive act that adds up to a huge impact, ensuring their delicate system is protected from unseen threats. You’ve learned how to turn a potentially overwhelming chore into a manageable and even routine part of your day, armed with practical strategies and the confidence that comes from knowledge.
So, take a deep breath, look at those sparkling clean bottles, and feel proud of the incredible parent you are. You’ve got this! With these newfound skills and insights, you’re not just washing bottles; you’re building a foundation of health and safety for your baby, one perfectly clean feeding at a time. Now it’s your turn to put these techniques into practice, transforming your bottle-washing routine from a task into a seamless act of love.
Frequently Asked Questions About Washing Baby Bottles
How often should you wash baby bottles?
You should wash baby bottles immediately after every single feeding. This prevents milk residue from drying and hardening, which makes it much harder to clean, and significantly reduces the growth of bacteria that thrive in milk. Prompt washing ensures optimal hygiene for your baby.
Do you need to sterilize baby bottles every time?
For healthy, full-term infants, daily sterilization is generally not necessary after the initial period (e.g., first 2 months) or the first use. Thorough washing with soap and hot water is often sufficient. However, sterilization is recommended if your baby is under 2 months old, was born prematurely, has a weakened immune system, or if the bottles have been used by a sick baby. Many parents choose to sterilize regularly for peace of mind.
What is the best brush for cleaning baby bottles?
The best bottle brush is one specifically designed for baby bottles, featuring sturdy, durable bristles that can reach all interior surfaces and corners. Look for brushes that come with a smaller, dedicated nipple brush to thoroughly clean tiny openings and intricate parts. A bottle brush with a comfortable, non-slip handle is also a plus for ease of use.
Can you wash baby bottles with regular dish soap?
It’s best to use a gentle, unscented dish soap that is free from harsh chemicals, dyes, and strong fragrances. Many brands offer dish soaps specifically formulated for baby items. If using regular dish soap, ensure it’s food-grade and doesn’t leave behind any irritating residues that could affect your baby. Always rinse bottles thoroughly to remove all soap.
How long can a washed bottle sit out before use?
Once a bottle has been thoroughly washed and completely air-dried, it can be reassembled and stored in a clean, dry, and dust-free environment (like a closed cabinet) for several days. However, it’s always best practice to use them within 24-48 hours if possible, and to check for any dust or contaminants before each use. Sterilized bottles should also be used within 24 hours if kept covered.
What’s the difference between cleaning and sterilizing?
Cleaning refers to physically removing milk residue, dirt, and most germs from bottles using soap and water. Sterilizing goes a step further by killing almost all bacteria, viruses, and other microorganisms that might remain after cleaning. Cleaning makes bottles visibly clean, while sterilizing provides an additional layer of germ-killing protection. Cleaning is always done first, followed by sterilization if desired.